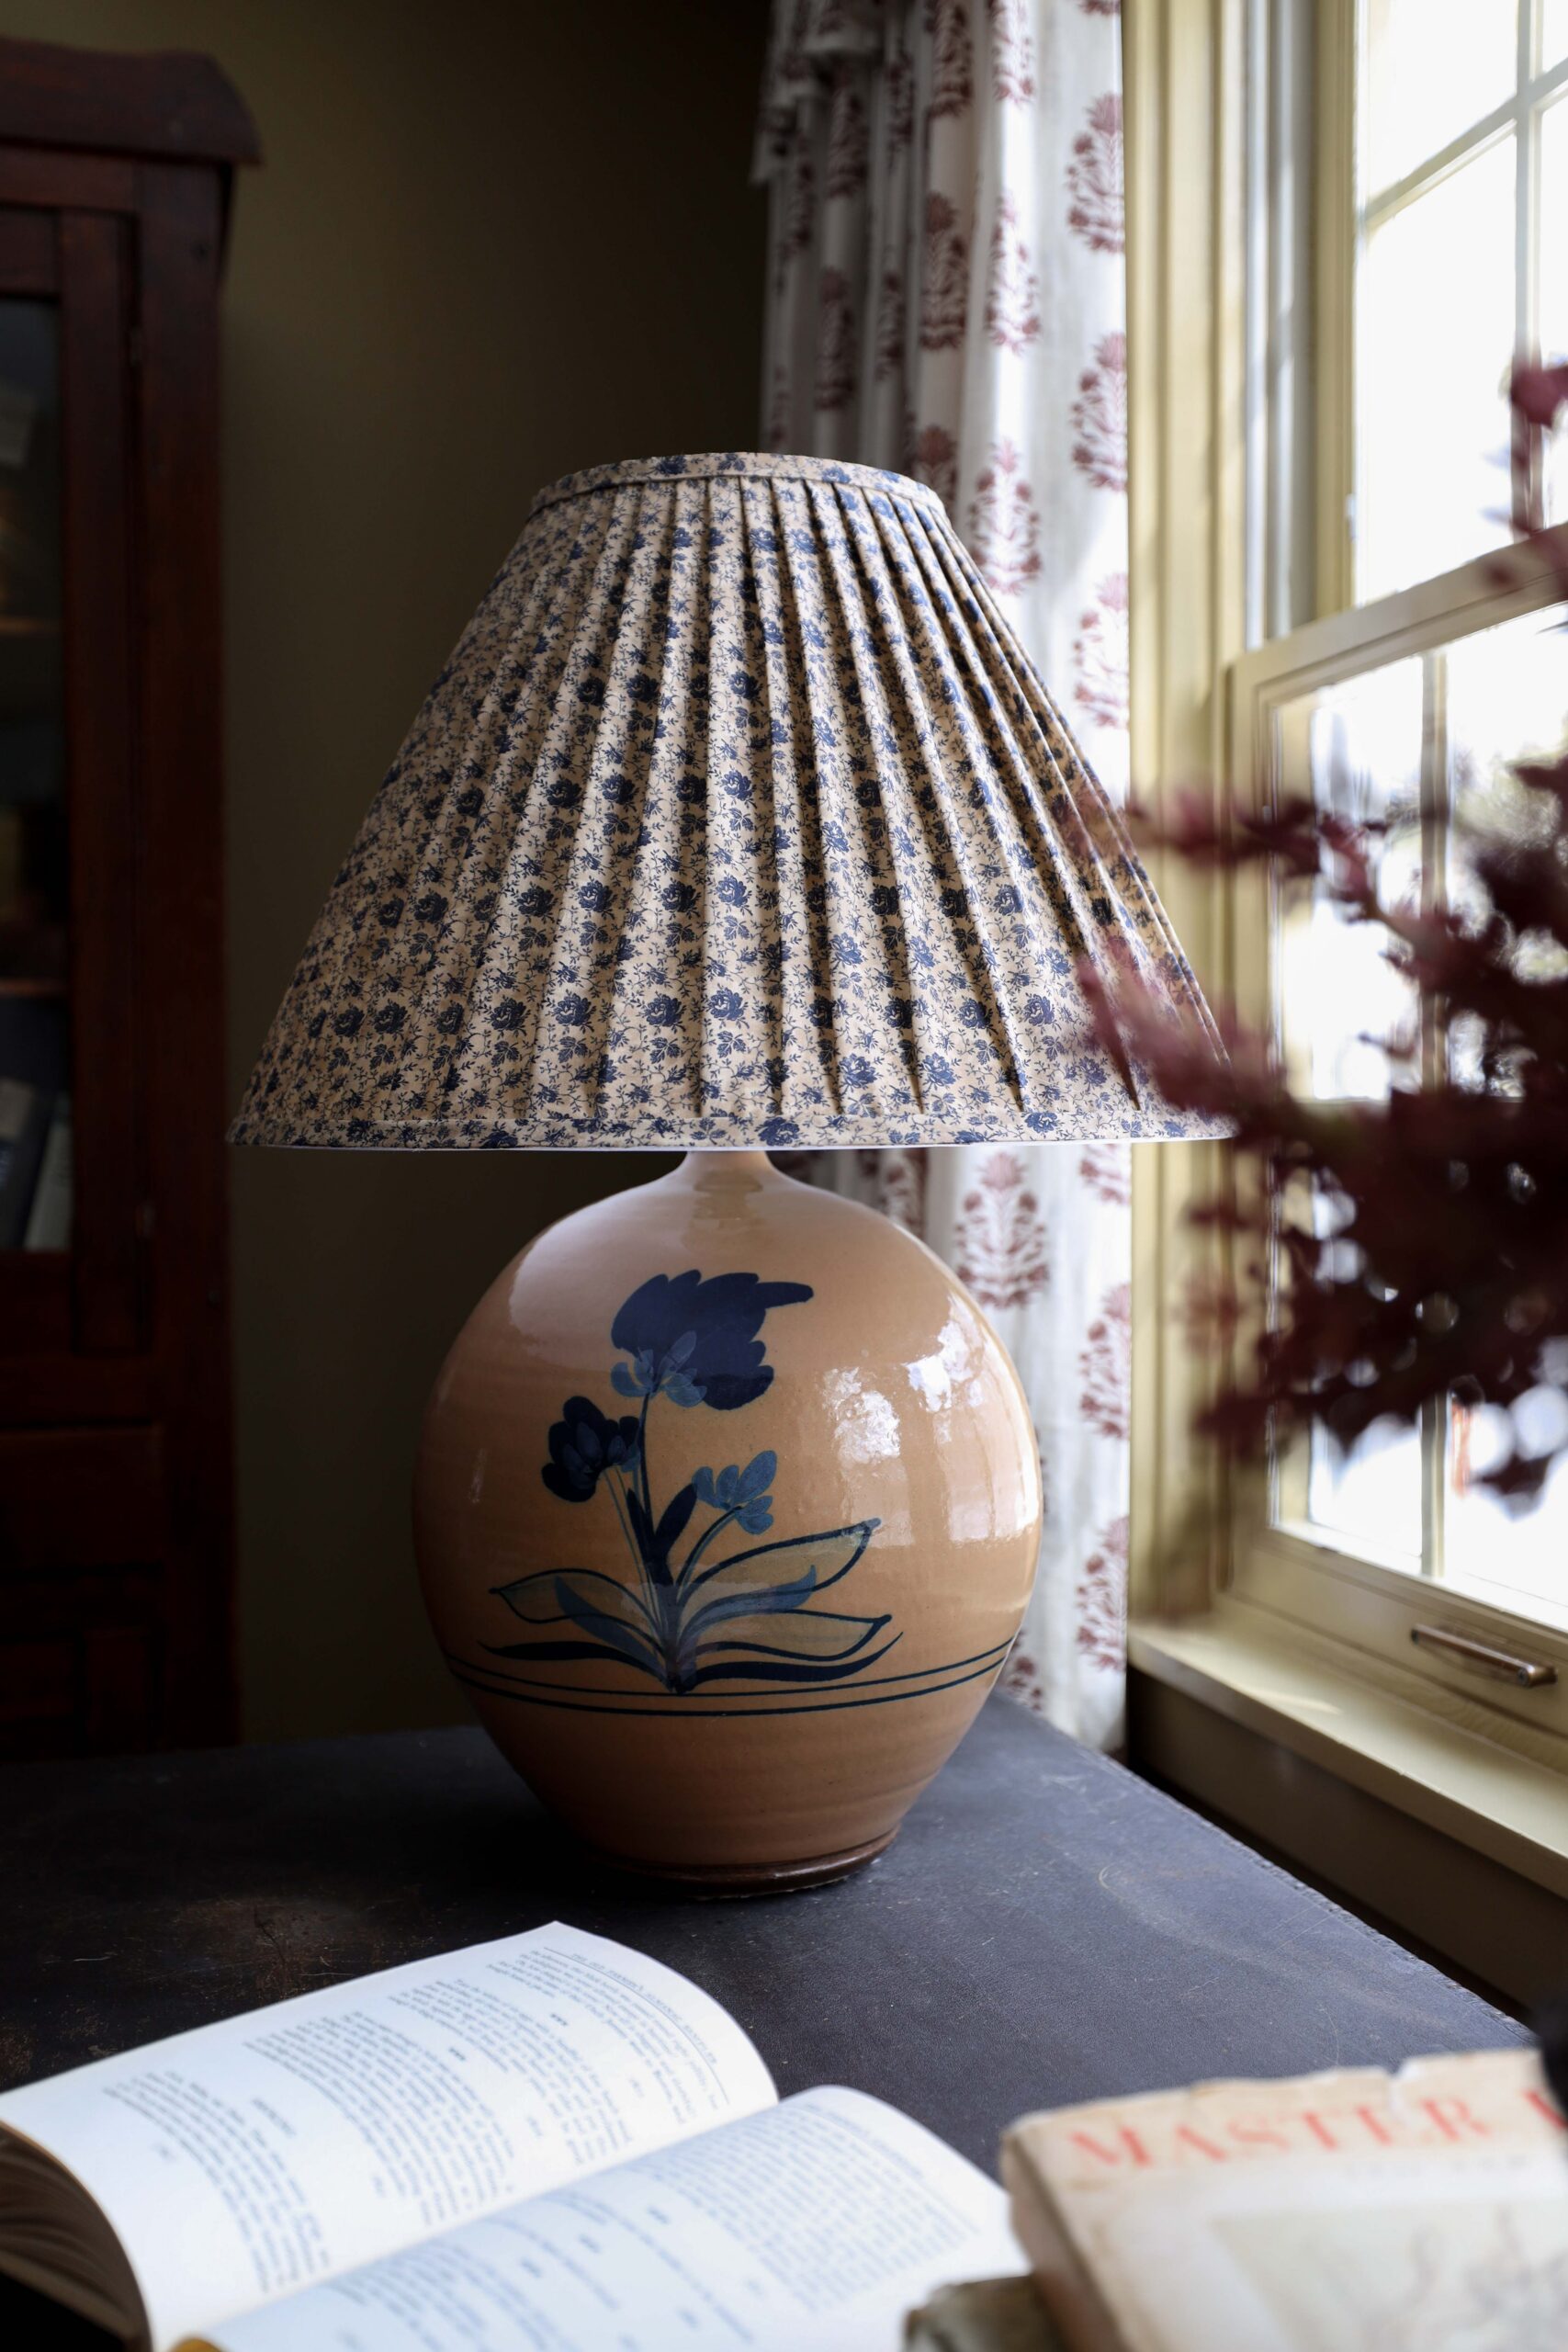

Two things about me: I like a pleated lamp shade, and I LOVE a money-saving DIY. For the guest bedroom makeover, I opted to DIY a pleated lamp shade, and I was stunned by how good it turned out! It was pretty easy to make, didn’t require any sewing, took only a few hours of my time, and cost me only $50 in total.
I hadn’t planned to share a how-to since there are already plenty of pleated lampshade tutorials out there. But after tweaking the tutorials I read online, I found myself using a process of my own – one that sidesteps a lot of the frustrations other DIYers have run into. So here’s exactly how I made my pleated lamp shade.

This post contains affiliate links.
Supplies Needed:
- Lamp Shade
- Fabric – 2 yards (Cotton is easiest to work with – a small & busy motif looks best)
- Hot Glue Gun (a mini size works best, but a regular size will do)
- Hot Glue Sticks
- Scissors
- Iron & Ironing Board


1. Cut & Fold Your Fabric
Measure the height of your lamp shade and cut your fabric 1 inch wider. My lamp shade is 12.5 inches high on the slant, so I cut one long rectangle piece of fabric that was 13.5 inches wide and 2 yards long. I used nearly all 2 yards of length for my 18″ shade.
Once cut, fold the top edge of your fabric down 1/4-1/2 inch and iron it in place – as shown in figure 2 above. This ensures that the top of the fabric doesn’t show a frayed edge. (A lot of tutorials don’t do this. They glue the fabric on the shade, leaving extra fabric on both the top and bottom. Once they cut off the excess fabric from the top, the raw edge and loose threads are visible and hard to hide. Creating a finished edge for the top looks much more professional.)


2. Fold & Glue The Pleats Along The Top
Using a hot glue gun, run a line of glue all the way down the back seam of the lamp shade. Press your fabric on, aligning the top of the fabric (folded edge) with the top of the shade. (A lot of tutorials recommend leaving extra fabric on the top of the shade, but when you cut the excess fabric off, the raw edge becomes very visible. That’s why I folded the top edge down in the previous step. That’s also why I lined up the fabric with the top of the shade, so I didn’t need to cut excess fabric off the top.)
Then, pinch and fold your fabric at the top to create a pleat. Glue each pleat in place. I eyeballed my pleat sizes, but they were about 1/2 inch wide. Continue pinching, folding, and gluing, only along the top, until you get back to the start.


3. Fold & Glue The Pleats Along The Bottom
Once you pleat the top of the shade, you can start working on the bottom. I found that I didn’t have a ton of extra fabric to work with, so my bottom pleats were pretty tiny, but the ripple was still good.
Pull the fabric taut and form a fold at the bottom of the shade. Glue the fabric to the shade and add a dot of glue under the fold to hold it in place.
Once you reach the end of the shade, fold the last bit of fabric under your last pleat to hide the raw edge and glue it down.

4. Cut Off The Excess Fabric
Carefully cut off the excess fabric from the bottom of the shade. You’ll want to cut it as close to the shade as possible.


5. Make The Bias Tape
With the excess fabric, create your bias tape. Bias tape is a narrow strip of fabric cut at a 45° angle (the bias). This is used to cover the raw edge. Cutting on the bias ensures the fabric has stretch and flexibility in multiple directions for finishing curved edges.
(Many tutorials fail to cut the fabric on the bias, which is why so many DIYers have a hard time applying the bias tape. It will bunch easily, and it won’t lie flat on the lamp shade. If you have a tapered shade, you’ll need to cut your fabric on the bias!)
Start by measuring the circumference of the lamp shade at both the top and bottom. Then cut two strips of fabric, each 1¾ inches wide, that are a bit longer than the circumference measurements to allow for overlap.
Fold your bias tape like a book sleeve. I.e. fold the edges in, meeting at the center, and iron. Then fold that in half and iron again. In the end, your bias tape should look like the second image above.


6. Glue The Bias Tape On
Starting on the back of the shade, glue the bias tape onto the top perimeter. Continue gluing and wrapping until you reach the end. Fold the end of the bias tape under to hide the raw edge, and glue it down. Repeat on the bottom of the shade.
And that’s it!


Supplies Needed For A DIY Pleated Lamp Shade
SCROLL RIGHT TO VIEW THE FULL LIST →
Leave a Reply
Where behind the scenes, exclusive advice, and candid conversations are sent straight to your inbox every week.
The Inside Scoop
DO YOU WANT

Love this and yes, I’ve seen so many different tutorials and it’s nice to see the modifications! I avoided the raw top edge as well by using a cotton. lightweight dishtowel that was the perfect size for a small shade. I used it long ways with the hem at the top so already had my clean, finished edge and no need for bias tape.
That finished top edge makes a big difference! Love the idea of using a dish towel!
Hi Danica,
I’m confused about the need to buy 2 yards of fabric. That would mean before cutting, the fabric would be 72” x 44”. You said to cut the fabric 1” longer than the height of the shade. So your cut fabric piece is now 14.5” x 44”. Is the remaining length (57.5”) what you used to make the bias trim? That seems like a lot left over.
Am I understanding all of this correctly? I’ve made pleated shades in past. But I cut strips of fabric & glued them on. I would love to try your method. It looks so nice!
Hi Mary! So I cut one long strip of fabric that was 13.5 inches wide and 2 yards long. After pleating my 18″ shade, I used nearly all of the length. The remaining fabric is for the bias tape. Since it needs to be cut at an angle, you need a bit of fabric for that. There is definitely some fabric left over in width, but not much in length. Hopefully that makes sense!
Yes, I get it now. I envisioned you cutting your length of fabric horizontally. But you cut it vertically.